


How to install a Jet Pump
Quick Links
- Prepare a level concrete foundation for mounting the Jet mono block and tighten the motor base using the foundation bolts as shown in Fig. 1(a) to (d). For Bore Mounted Type Vertical Jet Mono bloc (TSJ Series), mount the set on the bore casing pipe shown in Fig. 7(e).
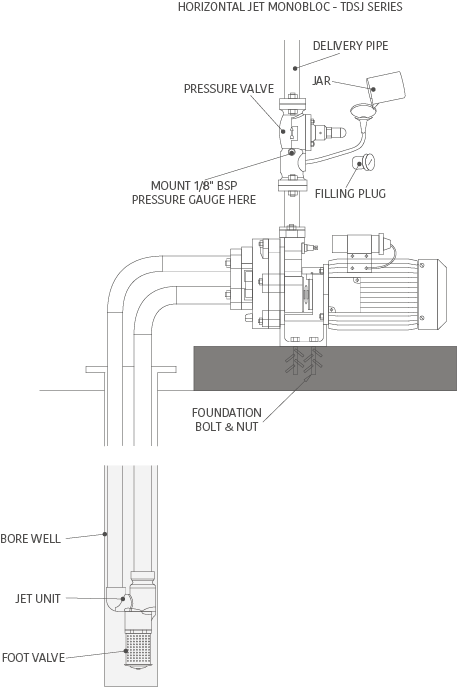
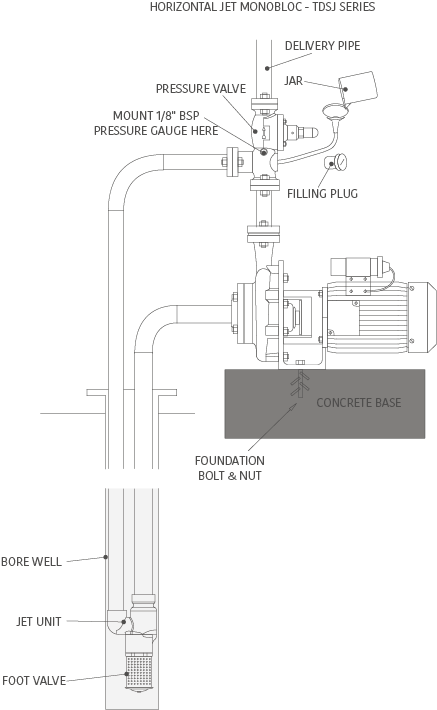
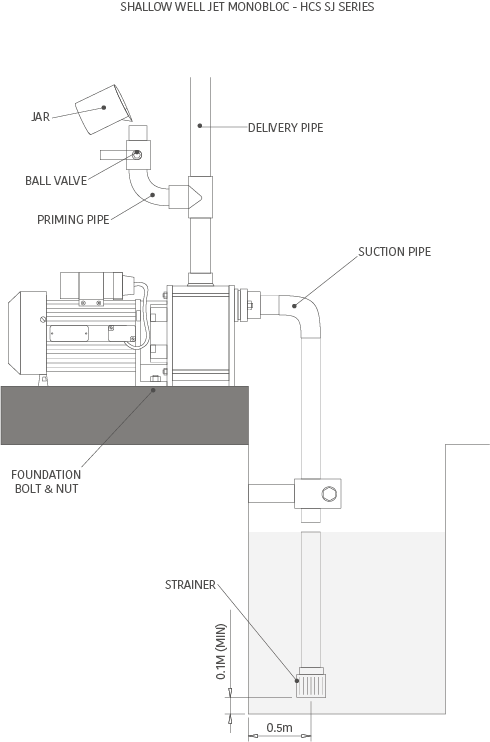
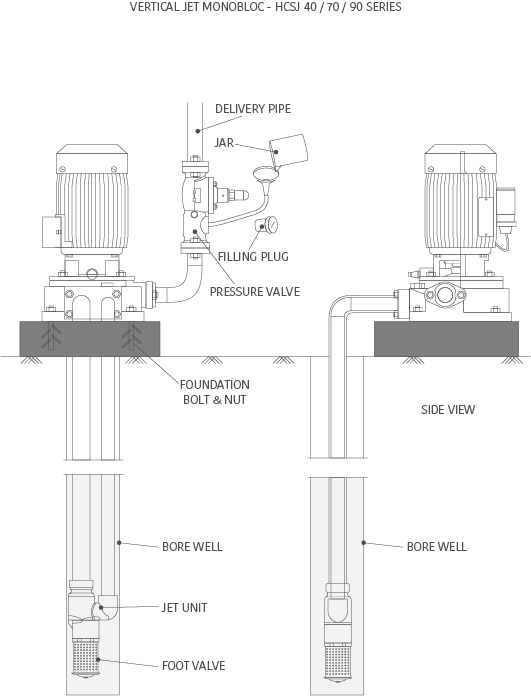
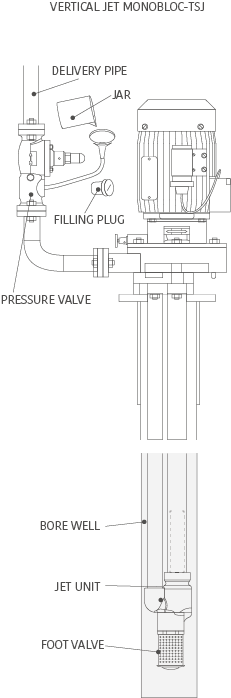
Fig. 1 Jet mono block erection guide
- Use prescribed pipe sizes as mentioned on the product name plate
- Ensure the Jet Unit with Foot valve and Strainer is fixed to the end of suction and return pipes located inside the bore well (HCSJ, TSJ, TDSJ Series). For the HCS SJ Series ensure the supplied strainer is fitted at the bottom of the suction pipe located in the well. Refer Fig.1, shown above, for recommendations.
- PRIMING
When the pump is started for the first time, it needs to be primed.
- In the HCS 80 / 11 and TDSJ Series, air cock is not provided.The volute casing internal design permits air to rise towards the pressure valve during the priming process when pouring water through the removed filling plug on the pressure valve as shown in Fig. 1 (a) and (b). When the pump is primed, further water cannot be added. Stop pouring water and refit the filling plug.
- In the HCS SJ Series, open the ball valve as shown in Fig. 1 (c), and prime the pump. Shut the valve after priming.
- In the HCS 40/70/90 and TSJ Series, remove the filling plug on the pressure valve and pouring water into it as shown in Fig. 1 (d) and (e), keeping the air cock open to release air. When the pump is primed, water continuously flows through the air cock. The pump is now primed. Stop pouring water, close the air cock and refit the filling plug.
- In case the water level, during priming, in the pressure valve continuously falls, this indicates a leak and to be corrected.
- Setting the pressure control valve for maximum discharge.
The easiest method of setting the control valve, shown in Fig. 2(a) and (b), for optimum discharge is the visual method. In this method, the pump set is run and adjusting the Round Head Screw (15) and measuring the discharge. By trial and error, adjust the Round Head Screw (15) till the flow of water in the discharge pipe is a maximum. Now lock the Hex. Nut (2) to prevent the Round Head Screw (15) from loosening. To access the Round Head Screw (15), the pressure valve Cap Nut (1) needs to be removed and then refitted after adjustment to prevent tampering.
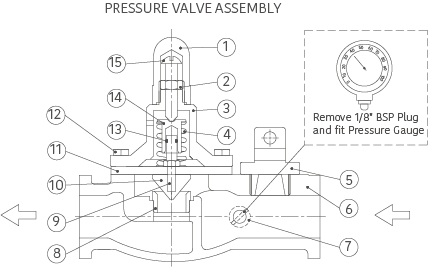
Fig. 2(a) Pressure valve - For HCSJ 40/70/90, TSJ, TDSJ series
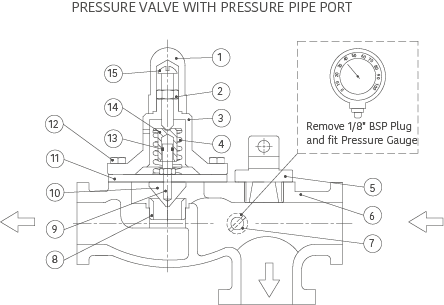
Fig. 2 (b) Pressure valve with pressure pipe port - for HCSJ 80/ 11 series
- Electrical installation
- Ground the single phase jet monoblock.
- Ensure electrical joints, if any, are properly and adequately insulated
- Connect the cable properly to the starter terminals to avoid loose connections
- Factor in low voltage operation while selecting cable size.
- Power cable connection to non clog sewage pump
- The motors are internally wired and pre-connected with the capacitor leads with two leads emerging out from the Terminal Box Cover
- Only Phase and Neutral need to be connected to these two leads (A1& A2)
Jet Pumps Overview
There are four main types of jet pumps; deep well, shallow well, multistage and mini. They do not require coupling as they are known for being relatively easy to install.
OverviewCompare Jet Pumps
How do Jet pumps perform when compared to the alternatives? Find out in our series of comparisons, which look closely at advantages/disadvantages, applications, installation requirements, space requirements and much more.
ComparisonsFrequently Asked Questions
For more information on Jet Pumps click below to view our list of frequently asked questions. These questions answer common queries regarding, cost, power, efficiency, information regarding how they work and much more.
FAQs